Showing posts with label March. Show all posts

Tuesday, April 9, 2013

Pita Bread

This pita bread isn't the fluffly, stuff with veggies variety so often found in great Greek restaurants. Instead, it's a slightly salty, hearty bread that will hand a pile of tomato salad or a scoop of hummus without bending. The kids ate it hot off the grill blowing on their fingers while the adults tried, but failed, to practice restraint.

If you are going to give this a try, make sure you start early in the morning and have the day blocked out. The process is involved, but the end result is well worth the effort. A triple batch was made for dinner and very few pitas remained by the end of the evening.

Pita Bread


1 tbsp. active dry yeast
1 tbsp. sugar
4 cups bread flour, plus more for kneading/forming
2 tbsp. salt
¼ cup and 1 tbsp. olive oil, plus more for greasing


1. Preheat Oven to 350°. In a small bowl, dissolve the yeast and sugar in ½ cup of warm water. Cover and set aside for 15 minutes.

2. In the bowl of a stand mixer fitted with the dough hook, dissolve the salt in 1 cup of warm water. Add the flour and turn the mixer on. Slowly add the yeast mixture and 1 tbsp. of the olive oil. Mix until the dough combines. Turn out the dough onto a lightly floured work surface and knead for 10 minutes.

3. Shape the dough into a ball and place on a lightly greased sheet pan. Coat lightly with oil. Cover with plastic wrap and place in a warm area for an hour.


4. Punch the dough down and knead for 5 minutes. Divide the dough into 6 (5 oz.) pieces and roll each piece into a ball. Place on a sheet pan lined with parchment paper. Cover the balls with plastic wrap, being careful not to let the plastic wrap stick to the balls. Let the balls proof for 15 minutes.


5. Lightly dust one piece of dough at a time on both sides with flour. Using a lightly floured rolling pin, roll the dough to get it to 7" in diameter and 1/8" thick.


6. Transfer the dough to an inverted lightly floured sheet pan. Place in the 350° oven and cook for 3 minutes. Flip the bread over and cook for another 3 minutes. Remove the bread from the oven, transfer to a parchment paper lined cookie sheet. Place a second piece of parchment paper on top of the bread. Let the bread sit for 10 minutes, or until cooled.


7. When ready to serve, lightly brush the pitas with olive oil and grill for 1-1 ½ minutes on each side. Cut the bread into wedges and serve.


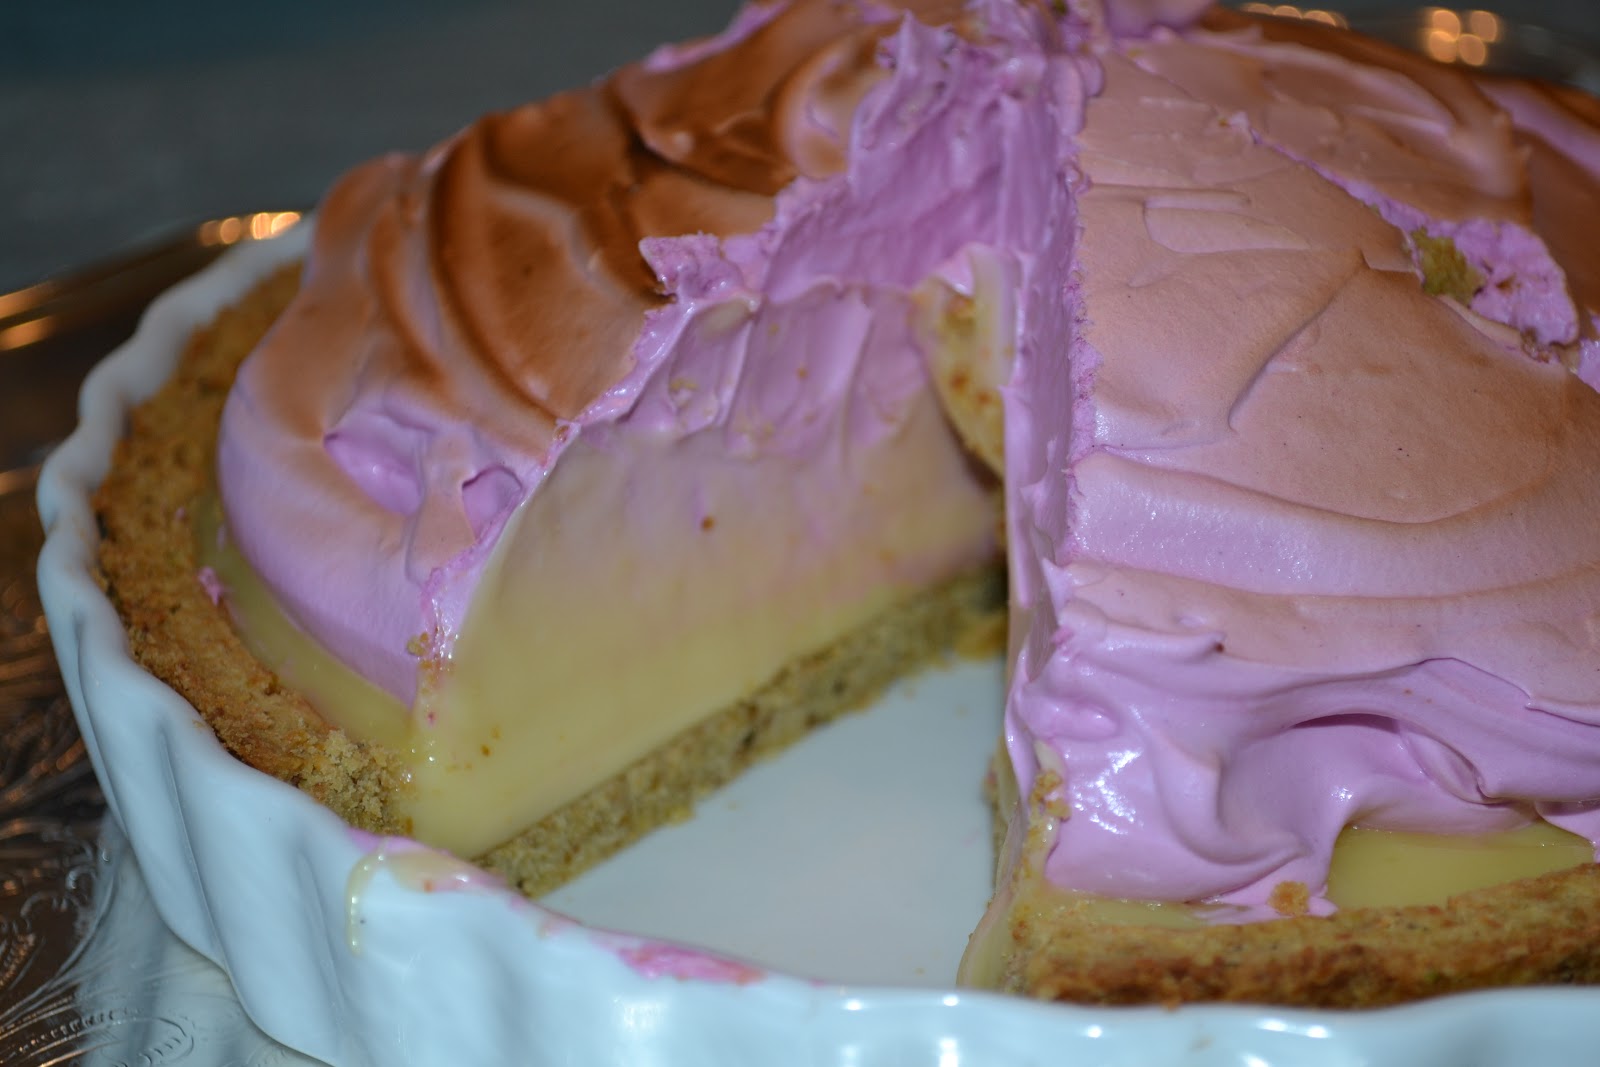
Pomegranate Meringue Rose Tart

This dessert was an exercise in persistence and patience. First it began with the quest for rose water. Later we discovered a local Mediterranean eatery sells the heavenly scented liquid, after a Amazon.com purchase had been completed. Then it was the never ending search for the correct "high-quality white chocolate." Many e-mails went back and forth among us trying to determine if baking white chocolate was correct, if white chocolate chips for cookies would work, and if any local candy stores had what was required. In the end another Amazon.com purchase was placed.

Then the day of the dinner Tara woke (I would say "early" but she is always up before dawn) and began by making the crust, letting it rest and hour, rolling it out, letting it rest, baking it, letting it cool....etc. It was an all-day affair. In the end a very pretty but overly sweet tart. Next time leave the sugar out of the meringue and up the rose water to 1/4 tsp. and enjoy with a nice cup of tea.

Pomegranate Meringue Rose Tart


FOR THE CRUST:
3/4 cup pistachios
1/4 cup sugar
1 1/2 cups flour
1 stick unsalted butter, cubed and chilled
1 egg yolk
1/4 cup cold water

FOR THE GANACHE:
12 oz. high-quality white chocolate, finely chopped
1/2 cup orange juice
1/8 tsp. rose water

FOR THE MERINGUE:
1 cup sugar
1/2 cup pomegranate juice
1 tsp. cornstarch
1/2 tsp. cream of tartar
4 egg whites
20 drops red food coloring (optional)


Make the crust:
  1. Combine pistachios and sugar in food processor and process until finely chopped.
  2. Add flour and process to combine.
  3. Add butter and pulse until no large chunks remain.
  4. Add egg yolk and water and mix just until combined.
  5. Transfer to counter and knead into a disk.
  6. Wrap in plastic wrap and refrigerate for 1 hour.
  7. On a floured counter, roll dough to 1/8" thick.
  8. Line a 9" tart pan with dough.
  9. Prick with fork over the bottom and refrigerate for 1 hour.
  10. Heat oven to 375°.
  11. Bake for 20 minutes and then let cool to room temperature.
Make the Ganache:
  1. Place chocolate in a medium bowl and set a fine strainer over bowl.
  2. Heat juice in a small saucepan over medium-high heat until it begins to simmer.
  3. Remove from heat and pour through strainer into bowl with chocolate; let sit for 1 minute.
  4. Using a rubber spatula, slowly stir rose water into mixture until smooth.
  5. Pour ganache into cooled crust and let cool completely.
Make the meringue:
  1. Place the sugar and juice in a small saucepan and bring to a boil with a candy thermometer.
  2. Place cornstarch, cream of tartar, and egg whites in a stand mixer with a whisk and beat to soft peaks.
  3. When syrup reaches 250°, pour into a glass measuring cup, and then slowly stream into the beating egg whites until all is added; add food coloring, if you like.
  4. Continue beating until glossy, stiff peaks form.
  5. Immediately pipe or cover the pie with the meringue.
  6. Chill until meringue is firm.
  7. Use a blowtorch or the broiler to brown the meringue.


    Monday, April 8, 2013

    Sweet Pepper Salad

    Interestingly, this sweet pepper salad calls for fire roasting green rather than the typically sweeter red peppers. The soft texture perfectly compliments warm pita bread while while the tangy preserved lemons give it enough zest to enjoy on its own.

    Sweet Pepper Salad


    2 tbsp. olive oil
    8 green bell peppers
    1 cup chopped flat-leaf parsley
    1/2 tsp. cumin
    1 minced peeled clove garlic
    1 minced Preserved Lemon
    Salt

    1. The recipe called for the peppers to be seared in a cast iron skillet, however doing it over a grill made for a more uniform and easier sear. After all sides are blackened, place peppers in a brown paper bag, close bag, and allow peppers to cool for 20 minutes.

    2. Remove skins by rubbing the peppers inside their bag. Then remove seeds and veins and dice into 1'' pieces.
    3. Heat 1 tbsp. olive oil in same skillet over low heat. Add peppers, chopped flat-leaf parsley, cumin, garlic, preserved lemon, and salt.

    4. Cook about 15 minutes or until the juices evaporate.
    5. Cool and serve.

    Friday, April 5, 2013

    Pistachio Sauce

    This sauce is not a very wet sauce, so do not be surprised if it looks like wet chopped nuts...it is supposed to. The combined flavors of the pistachios and the mint combined well with the lemon preserved stuffed chicken. So much so, more than one person swore they'd make it again.

    Pistachio Sauce


    1 cup shelled unsalted pistachios, toasted and coarsely ground
    3 tbsp. roughly chopped flat-leaf parsley
    1 tbsp. roughly chopped fresh mint
    1 clove garlic, smashed and minced into a paste
    1 red Fresno or Holland chile, stemmed, seeded, and minced (use a jalapeno if you can not find one of these two chiles)
    Zest and juice of 1 lemon

    3/4 cup extra-virgin olive oil
    Kosher salt and freshly ground black
    pepper, to taste


    1. Combine pistachios, parsley, mint, garlic, chiles, and lemon zest and juice in a medium bowl.
    2. Add oil in a thin stream, whisking constantly with a fork until the sauce is well combined; season with salt and pepper.

    3. Cover sauce and let sit at room temperature for 1 hour before serving. Sauce will keep, refrigerated and covered, for up to 3 days. 


      Wednesday, April 3, 2013

      Chicken with Preserved Lemon and Green Olives

      The chicken in this simple but exotic dish from Yacout is so moist and succulent that its flesh can easily be lifted from the bones and eaten, Moroccan-style, with the fingers. This chicken it great on it's own but for an even better flavor combination, serve it with the pistachio sauce on the side. 

      Chicken with Preserved Lemon and Green Olives

      Ingredients

      5 cloves garlic, peeled
      Salt
      1/4 cup minced fresh parsley
      1/4 cup minced fresh cilantro
      1 tsp. ground cumin
      1 tsp. ground ginger
      Pinch saffron threads
      Freshly ground black pepper
      2 2 1/2-lb. chickens, quartered
      2 chicken livers
      3 medium onions, grated and drained
      12 oz. Moroccan green olives, Pitted
      1 Preserved Lemon, rinsed and completely quartered

      Instructions

      1. Crush garlic on a cutting board with flat side of a chef's knife. Sprinkle with about 2 tsp. salt, then finely chop garlic and crush again to form a smooth paste. Combine garlic paste, parsley, cilantro, cumin, ginger, saffron, and pepper in a large bowl. Add chicken quarters and livers, stirring well to coat with herbs and spices. Cover bowl and set aside to marinate for 1 hour at room temperature or 4 hours in the refrigerator.

      2. Place chicken quarters and livers in a large heavy-bottomed casserole. Add onions and 2 cups water. Bring to a boil over medium-high heat, then reduce heat to medium-low, cover, and simmer gently for 30 minutes, stirring occasionally to keep chicken moist.

      3. Remove chicken livers and mash to a paste with a fork, adding a bit of cooking liquid if necessary. Return livers to casserole and cook for another 20 minutes or until chicken is tender and thigh meat comes away from bone.

      4. Add olives and lemon quarters to casserole and cook, uncovered, for another 10 minutes.

      5. Remove chicken, olives, and lemon quarters from casserole with a slotted spoon and place on a platter; set aside, cover, and keep warm. Bring pan juices to a high boil and cook until a very thick sauce forms, about 15 minutes. Spoon sauce over chicken and serve.


      Tuesday, April 2, 2013

      March 2013: A Moroccan Buffet

      In approaching this month's menu, I kept coming back to sultry nights, tangy lemons, sweet mint, and the bright patterns of Morocco. Having never encountered the flavors of Morocco I was intrigued by the color and ingredient combinations, making it too tempting to resist.

      Besides, who could say no to warm homemade pita bread fresh off the grill?

      Moroccan cuisine is extremely refined, thanks to Morocco's interactions and exchanges with other cultures and nations over the centuries. Moroccan cuisine has been subject to Berber, Moorish, and Arab influences. The cooks in the royal kitchens of Fes, Meknes, Marrakesh, Rabat and Tetouan refined it over the centuries and created the basis for what is known as Moroccan cuisine today.

      Morocco produces a large range of Mediterranean fruits and vegetables and even some tropical ones. Common meats include beef, mutton and lamb, chicken, camel, rabbit and seafood, which serve as a base for the cuisine. Characteristic flavorings include preserved lemon, cold-pressed, unrefined olive oil and dried fruits. It is also known for being far more heavily spiced than Middle Eastern cuisine.

      We knew it was going to be a night of full flavored food.


      The Theme
      A Moroccan Buffet

      The Menu
      Sides: Pita Bread | Eggplant Smothered with Charmoula | Moroccan Pasta SaladMoroccan Tomato Salad | Moroccan Potato Salad| Sweet Pepper Salad
      Main Dish: Chicken with Preserved Lemon and Green Olives (serve with Pistachio Sauce)
      Dessert: Pomegranate Meringue Rose Tart


      Thursday, May 31, 2012

      Paella - paˈeʎa

      Paella 

      (Valencian: [paˈeʎa], Spanish: [paˈeʎa]

      Though I had heard of this dish, I honestly could not recall ever having it. Just my luck, when it came to pick dishes from Mandy's menu I didn't have much of a choice...two of the dishes involved phyllo which I am an old pro at working with (the pain in the rear that it can be) from many years of helping my mother and grandmother make Baklava. What is the challenge in that? Yes, you read that correctly, the Rookie makes a mean Baklava. And I am not talking about the layered version either. This mama bakes the fancy rolled kind (because until the age of 15 or so, I didn't realize it even came in another shape!) But for those craving that recipe....you'll have to wait. Tonight we cook Paella!

      Ingredients

      2 1/2 pounds skinless, boneless chicken breast halves - cut into bite-size pieces
      all-purpose flour
      salt and pepper to taste (to taste what? Things like this are not help to The Rookie)
       Olive oil
      1 pound chorizo sausage, chopped (I used 2 10 oz. packages with is a bit more than 16 oz or 1 lb, depending on your geographic location this could be a challenge to find. )
      1 onion, chopped
      4 cloves crushed garlic
      2 cups chopped tomatoes (when buying a tomato I do not know how many cups it will equate when chopped...so I bought three and hoped for the best)
      2 cups white rice
      2 (6.5 ounce) cans minced clams (drained)
      2 cups frozen green peas
      1 pinch saffron (if you have never used saffron before, ask a Foodie or Gourmet if they have some you can use...this stuff is not cheap. I am not sure I am willing to spend $18 on a "pinch" of anything)
      5 cups boiling chicken broth
         Many of the recipes call for shrimp. As this month's host is allergic, I added more sausage and chicken vice a trip to the emergency room.


       Let's get cooking!

      Recipe

      Preheat oven to 400 degrees F (200 degrees C).
      Place the chicken pieces in a large ziplock bag with some flour, salt, and pepper. Close bag (VERY IMPORTANT!). Shake to coat chicken (or give to your four year to do).


      In a large skillet, fry the chicken in olive oil until brown and crispy. Set aside.

       Brown the sausage in a skillet and set aside. 
       Place about 2 tablespoons olive oil in a large skillet and fry onion and garlic until onions are tender. 


      To the same skillet, add chopped tomatoes and saute for 3 to 4 minutes. 
       

      Add rice to the skillet and mix well.
      Put rice mixture, chicken, and sausage in casserole dish.
      Add can of clams, peas, saffron, and chicken broth. 
       

      Cover casserole dish.
      Bake until all the liquid is absorbed and rice is tender. You may need to add more broth if rice is not done.
       
      I am not sure if this tasted as desired or not, however I left for Supper Club with two 9x13 dishes and came back with less than enough for the next day's lunch. I think it was a hit (even the kids liked it which is always a plus!).


      Thursday, May 24, 2012

      Italian Rice Balls Recipe

      I have never heard of these before Mandy posted her menu. This was definitely out of the box for me. Since I LOVE Italian I thought I’d give it a shot! They were easy and tasty. However, If I make them again I think I will season the rice a bit more. Maybe by adding some fresh chopped garlic and basil. These were a huge hit with the kids and grown-ups alike (although I think the grown-ups liked the name better)! Here is the recipe adapted by Allrecipes.com. My one tip to this is to keep your hands very wet with water when you are rolling the balls they are very sticky. Also, used jarred sauce for the dipping sauce. Hope you all enjoy!
      Italian Rice Ball Recipe

      The tasty result! :)
      Ingredients

      2 eggs
      1/3 cup grated Parmesan cheese
      1 tablespoon dried parsley
      1/4 teaspoon freshly ground black
      pepper
      1 teaspoon salt
      1 quart water
      1 teaspoon salt
      1 cup uncooked white rice
      1 1/2 cups dried bread crumbs
      2 cups olive oil


      Directions


      1.  In a medium bowl, whisk together eggs, cheese, parsley, pepper, and 1 teaspoon salt. Cover and refrigerate.

      2.  Pour water and 1 teaspoon salt into a large saucepan and bring to a boil. Stir in rice and reduce heat to low. Cook rice until water is almost absorbed, stirring frequently. Remove from heat and slowly pour in egg mixture, stirring rapidly to prevent egg from scrambling. Allow rice mixture to cool for 1 hour.

      Rice after being cooked, ready to be cooled and rolled.
      3.  Pour bread crumbs into a pile on one end of a cutting board. Dampen hands and roll rice mixture into 1 inch balls, then coat each one with bread crumbs.


      Ready to roll!
      4.  In a small, deep skillet, heat olive oil to 350 degrees F (175 degrees C). (Should have enough oil to completely cover rice balls.)

      Frying the up!
      5.  Fry rice balls 6 at a time, turning as needed to ensure even browning. Drain on paper towels and serve warm.


      xoxo - Dolly
      “The Substitute”